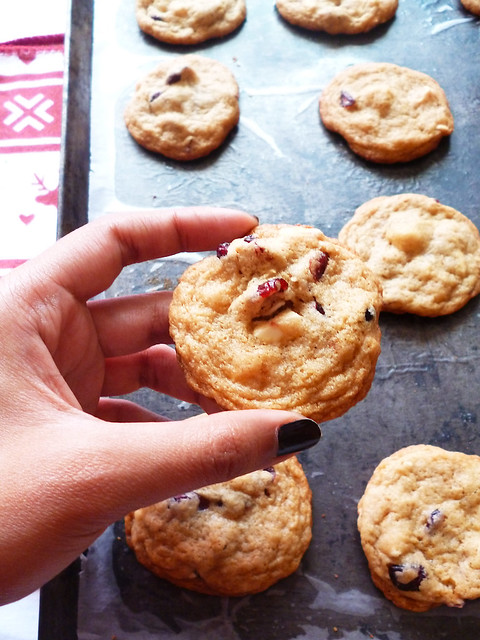
These cookies in particular had a long time on my to-do list, I was just waiting for the right time to make them, and what better time than Christmas time, right?, besides its ingredients are so holiday season appropriate.
Last week was the right time, and we finally had the chance to taste these delicious cookies, everyone loved them, and I must say they didn't lasted more than 2 days. Thanks to these cookies now I think white chocolate and dried cranberries are a match made in heaven, they smelled and tasted amazing, were crispy on the edges and soft in the middle, I'd say the perfect holiday treat!
These cookies are a great holiday activity to spend time with your loved ones, or just as a gift for all those special people in your life, just remember this is the time to have fun, be merry, and eat cookies.... Wish you a great week!
Estas galletas en particular tenían mucho tiempo en mi lista de cosas por hacer, sólo estaba esperando el momento adecuado para hacerlas, y qué mejor momento que la temporada Navideña, ¿no?, además sus ingredientes son tan apropiados para la temporada.
La semana pasada fue el momento adecuado, y finalmente tuvimos la oportunidad de probar estas deliciosas galletas, todo el mundo las amó y debo decir que no duraron más de 2 días. Gracias a estas galletas ahora creo que el chocolate blanco y los arándanos secos son una pareja hecha en el cielo, olían y sabían increíble, estuvieron crujientes en los bordes y suaves en el medio, yo diría que son el perfecto "gustito" para la temporada!
Estas galletas son una gran actividad navideña para pasar tiempo con sus seres queridos, o simplemente como un regalo para todas aquellas personas especiales en su vida, recuerden que este es el tiempo para divertirse, ser felices y comer galletas .... Les deseo una excelente semana!!
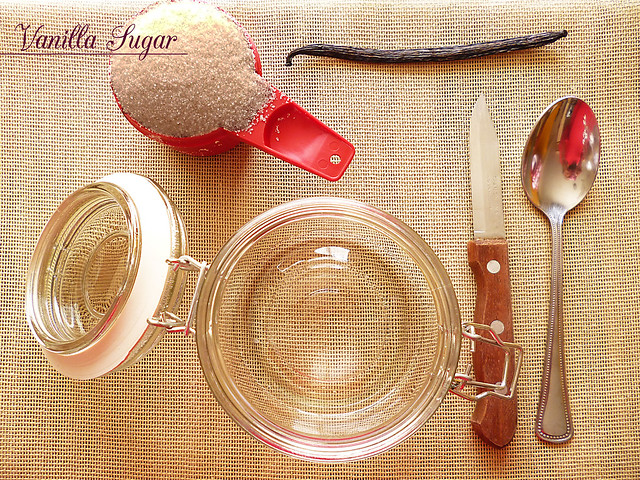
White Chocolate Cranberry cookies
Adapted from
Food Network
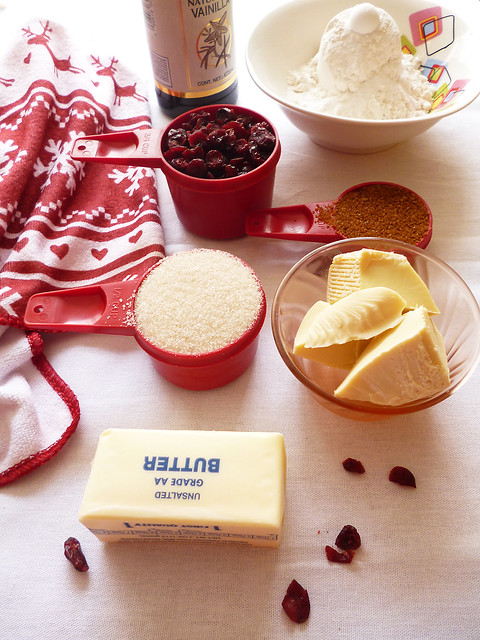
Ingredients
1/2 cup unsalted butter, softened (1 stick)
1/4 cup packed light brown sugar
1/2 cup granulated sugar
1 1/2 tsp vanilla extract
1 large egg
1 1/2 cups all-purpose flour
1 tsp baking powder
1/2 tsp baking soda
1/4 + 1/8 tsp salt
1 cup dried cranberries, halved
3/4 cup white chocolate chips or 4 oz. white chocolate chunks
Directions
1. Using an electric mixer with the paddle attachment, cream the butter and both sugars together until smooth, about 5 min. Add the vanilla and egg, mixing well.
2. Meanwhile, in a medium sized bowl pour together flour, baking powder, baking soda, and salt, whisk to combine.
3. Spoon the flour mixture gradually into the creamed sugar mixture, mix until you have a moist and smooth mixture, about 3 minutes or so, do not overbeat. Stir in the cranberries, and white chocolate, and mix until well combined.
4. Cover dough tightly with plastic wrap, and chill on the fridge for at least 1 hour and up to 2 days.
5. When you are ready to bake your cookies, preheat the oven to 350 degrees F. Line 2 baking sheets with parchment paper, or aluminium foil.
6. Remove cookie dough from the fridge, and drop by heaping spoonfuls, onto the prepared baking sheets, 2 inches apart. Bake for 10-12 min, or until lightly golden on top and the edges are set.
7. Cool on the sheet about 5 minutes, and then transfer to a wire rack to cool completely. Store in an airtight container for up to 2 weeks.
Galletas de Chocolate Blanco y Arándanos
Adaptada de
Food Network
Ingredientes
1/2 taza de mantequilla sin sal, ablandada (1 barra, 113 grms.)
1/4 taza de azúcar morena o mascabado
1/2 taza de azúcar granulada
1 1/2 cucharadita de extracto de vainilla
1 huevo grande
1 1/2 tazas de harina
1 cucharadita de polvo para hornear
1/2 cucharadita de bicarbonato de sodio
1/4 + 1/8 cucharadita de sal
1 taza de arándanos secos, picados en mitades
3/4 taza de chispas de chocolate blanco o 113 grms. de trozos de chocolate blanco
Instrucciones
1. Con una batidora eléctrica con el aditamento de la paleta, acremar la mantequilla y las dos azúcares hasta que quede suave, unos 5 minutos. Después agrega la vainilla y el huevo, mezcla bien .
2. Mientras tanto, en un tazón mediano vierta la harina, el polvo para hornear, el bicarbonato y la sal, mezcla para combinar .
3. Vierte la mezcla de la harina poco a poco en la mezcla de azúcar-mantequilla, mezclar hasta obtener una masa húmeda y suave, unos 3 minutos más o menos, no mezclar de más. Agregar los arándanos y chocolate blanco y mezclar hasta que esté bien combinada.
4. Cubre la masa con papel plástico y refrigera durante al menos 1 hora y hasta 2 días.
5. Cuando haya pasado el tiempo de espera o estes lista para hornear tus galletas, precalienta el horno a 180 grados C. Prepara 2 charolas para hornear con papel encerado o papel aluminio.
6. Retira la masa de galletas del refrigerador y coloca la masa por cucharadas llenas sobre las charola para hornear, más o menos a 5 cm de distancia. Hornea durante 10-12 minutos o hasta que esten ligeramente doradas en la parte superior y los bordes esten firmes
7. Enfriar en la charola por unos 5 minutos, y luego transferir las galletas a una rejilla para enfriar completamente. Se conservan en un recipiente hermético hasta por 2 semanas.
Love,
Di