Thursday, February 20, 2014

Lemon Ricotta Pancakes

Raspberry Bloom: Lemon Ricotta Pancakes

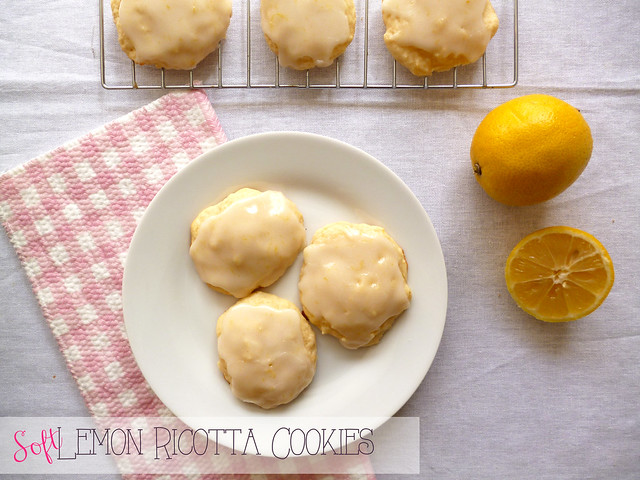
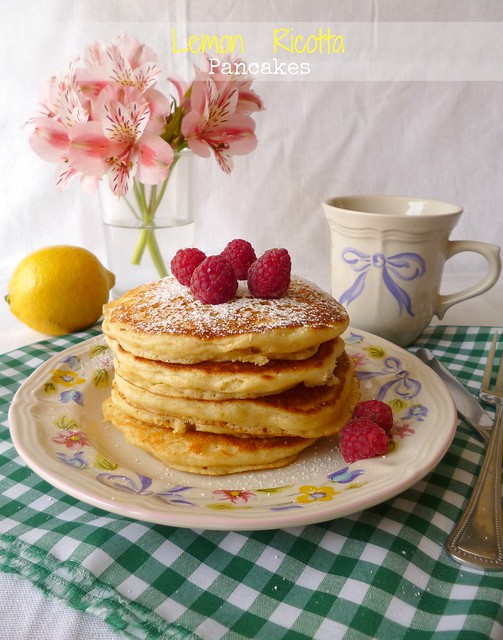
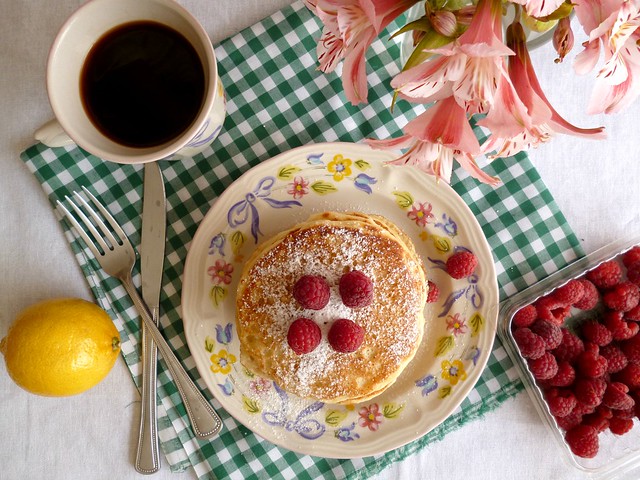
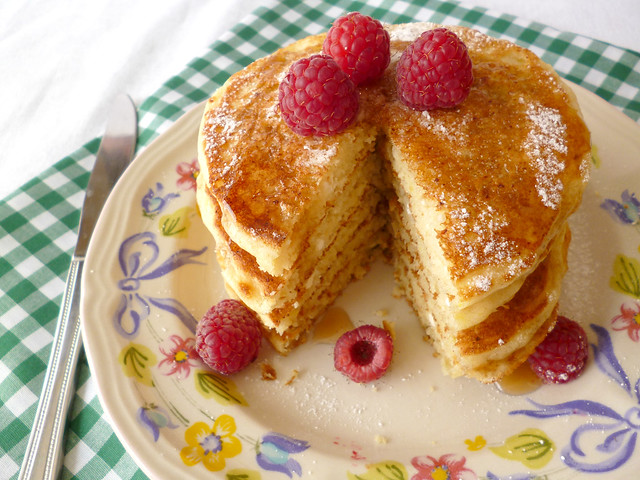
After Valentine's day the only thing I can think about is SPRING, recipes, flavors, colors .... The good thing is that here in Puebla the winter seems to be over, and that makes me a really happy girl, because from now on I'll be sharing many recipes with fresh ingredients and lots of color, like these lemon ricotta pancakes. They're soft, extra fluffy(almost like clouds), with a slight lemony flavor and tinny pieces of ricotta cheese, just talking about them makes me really hungry, lol, they're simply delicious. OK, enough with the rambling, the only thing I know is that you really have to try these so we can love them together, besides they're very fresh and easy to make, just pure perfection.

P. s. And yes, I love the combination of lemon and ricotta, here´s my previous recipe with these two yummy ingredients.

Después de San Valentín lo único en lo que puedo pensar es en la primavera, recetas, sabores, colores....Lo bueno es que aquí en Pueblita el invierno se acabo y eso me tiene muy feliz, porque de ahora en adelante habrá muchas recetas con ingredientes frescos y mucho color, como estos ricos hotcakes de limón y queso ricotta. Son simplemente deliciosos, son suaves, súper esponjaditos,  tienen ligero sabor a limón y trocitos de ricotta que no se deshacen por completo, sólo recordarlos me da hambre, jajaja. En fin, sólo se que tiene que hacerlos para entenderme, además son frescos y muy sencillos, pura perfección.

P.d. Y sí, me encanta la combinacion de limón y ricotta, aquí les dejó mi receta anterior con estos dos ricos ingredientes.

Raspberry Bloom: Lemon Ricotta Pancakes

Raspberry Bloom: Lemon Ricotta Pancakes

Raspberry Bloom: Lemon Ricotta Pancakes

Lemon Ricotta Pancakes 
Makes about 20 small pancakes; serves 4-5.
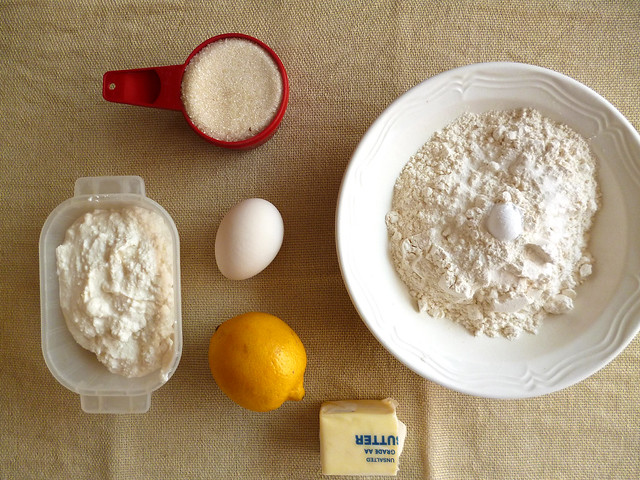
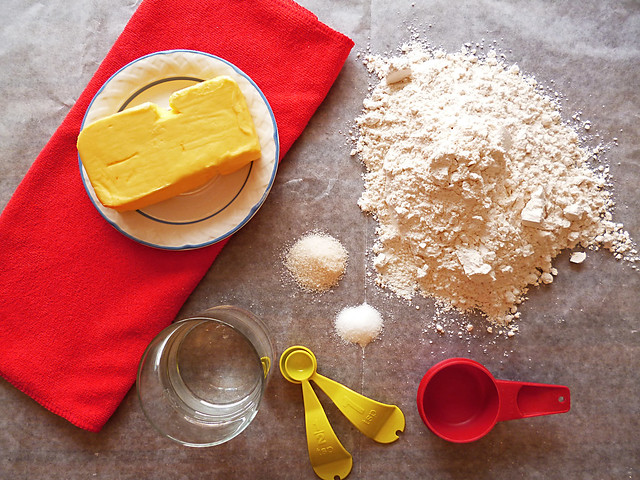
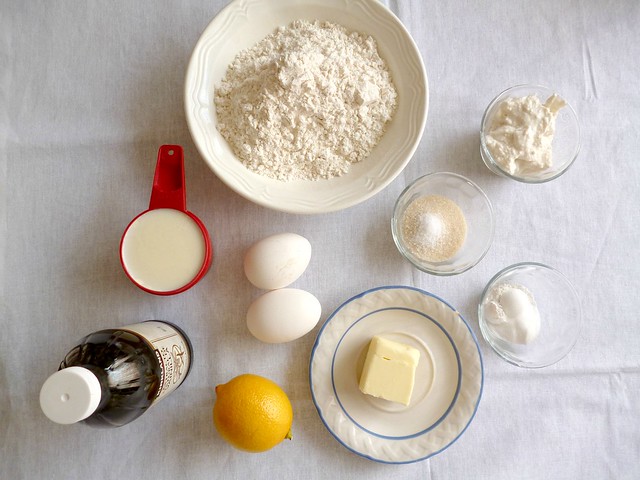
Ingredients:
2 cups all-purpose flour
2 tsp. baking powder
1 tsp. baking soda
1/4 tsp. salt
3 Tbs. sugar
2 eggs
3 Tbs. unsalted butter, melted and cooled
1 cup milk
1 cup ricotta cheese
1/4 tsp. vanilla extract
1 Meyer lemon, zest and juice (mine weighed about 4 oz.)

Plus:
1 to 2 Tbs. butter or nonstick cooking spray for greasing your pan
Maple syrup for serving
fresh raspberries(optional)

Directions
1. Preheat a large skillet on medium heat.

2. Pour all the dry ingredients into a medium sized bowl, minus sugar,  flour, baking powder, baking soda and salt. Whisk with a fork until well combined.  Set aside.

3. In  a larger bowl pour all the wet ingredients plus sugar, this will help to incorporate sugar faster, melted butter , eggs, milk, ricotta, sugar, vanilla, lemon zest and juice. Whisk with a fork until smooth and well combined.

4. Pour dry mix over wet mixture, and stir just until the batter is smooth and almost no lumps remain.

5. Grease your skillet very lightly with butter and pour about 1/4 cup of pancake batter. Cook for about 2 min, or until tiny bubbles start showing up around the edges of your pancakes, flip the pancakes and cook 2 minutes more, or until the bottom looks light golden brown. Keep warm until all the pancakes are cooked.

6. Serve with maple syrup. Enjoy!!!!

Hotcakes de Limón y Ricotta
Salen aproximadamente 20 hotcakes pequeños.  Sirve 4-5 porciones. 

Ingredientes: 
2 tazas de harina 
2 cdta. polvo para hornear 
1 cdta. bicarbonato de sodio
1/4 cdta. sal 
3 cucharadas. azúcar 
2 huevos 
3 cucharadas. de mantequilla sin sal, derretida y enfriada 
1 taza de leche 
1 taza de queso ricotta
1/4 cdta. extracto de vainilla 
1 limón eureka, ralladura y jugo (el mío pesaba alrededor de 110 grms.) 

Plus: 
1 a 2 cucharadas mantequilla o aceite en aerosol antiadherente para engrasar el sartén 
Jarabe de maple para servir 
frambuesas frescas (opcional)

Instrucciones
1. Precalienta una sartén grande o plancha a fuego medio.

2. Vierte todos los ingredientes secos en un tazón mediano (menos el azúcar),  harina, polvo para hornear , bicarbonato y sal. Batir con un tenedor hasta que estén bien mezclados. Ponlo a un lado .

3. En un tazón grande vierte todos los ingredientes húmedos , más el azúcar , esto ayudará a incorporar el azúcar más rápido, mantequilla, huevos, leche, ricotta, extracto de vainilla, ralladura y jugo del limón. Mezclar hasta que todo este bien incorporado.

4. Vierte la mezcla de ingredientes secos sobre la mezcla de ingredientes húmedos, y revuelve hasta que la masa tenga una consistencia lisa y casi no queden grumos .

5. Engrasa el sartén o plancha muy ligeramente con mantequilla y vierte aproximadamente 1/4 de taza de la mezcla de hotcakes. Cocina por unos 2 minutos o hasta que puedas ver  que pequeños agujeros comienzan a salir alrededor de los bordes de los hotcakes, voltea los hotcakes y cocina 2 minutos más , o hasta que la parte inferior se vea de un tono dorado claro. Mantenlos calientes hasta que estén cocidos todos los hotcakes.

6 . Servir con jarabe de maple. Disfrutenloss! !


Love,
Di

Thursday, February 13, 2014

Red Velvet Cupcakes

Raspberry Bloom: Red Velvet Cupcakes

I can't believe how fast time goes by, almost a month ago I was making my first V-day post, and  now we are just a few days away from Valentine's day. I had planned to share three recipes with you, but I only made two, shame on me, I know, but it's the thought that counts, right??

Each time we're close to a festivity(or new season) I start thinking about the classics, although I love experimenting with new recipes, I feel I must have that staple dish or dessert that represent certain events. So, obviously, the right thing to make to celebrate Valentine's day were no other than, red velvet cupcakes. I've made this recipe a ton of times, these cupcakes are moist, fluffy, and lightly sweetened, pure red velvet perfection. I'd say these are in my top 3 favorite cupcakes, there's something with the beautiful red hue in the cake, that I just can not resist!! I really love them, and I think these are a perfect last minute treat for Valentine's Day (or any day), that will bring lots of joy to all your loved ones!!!
                                                     __________________________

No puedo creer lo rápido que pasa el tiempo, hace casi un mes estaba publicando mi primer post de San Valentín, y así como así estamos a nada del gran día. Tenía planeado compartir tres recetas con ustedes y me quede en dos, que verguenza, lo sé, pero la intención es lo que cuenta, cierto??

Cada que hay festividades vienen a mí mente los clásico, y aunque me encanta experimentar con nuevas recetas, siento que simpre debe haber ese platillo o postre que representa ciertos eventos. Así que, obviamente , no había nada mejor para festejar San Valentín que, red velvet cupcakes. He hecho esta receta muchiiiisimas veces, estos cupcakes son esponjosos y ligeros en azúcar, pura perfeccion red velvet. Yo diría que estos estan en mi top 3 de cupcakes favoritos, hay algo en el hermoso tono rojo del pastel con lo blanco del frosting de queso crema que simplemente no puedo resistir!! De verdad me encantan, y creo que es algo que pueden hacer de último momento y que alegrara mucho su San Valentín( o cualquier otro día)!! 

Raspberry Bloom: Red Velvet Cupcakes

Raspberry Bloom: Red Velvet Cupcakes

Raspberry Bloom: Red Velvet Cupcakes

Raspberry Bloom: Red Velvet Cupcakes

Raspberry Bloom: Red Velvet Cupcakes


Red Velvet Cupcakes
Adapted from Pinch my salt. Makes 24 cupcakes.

Ingredients
2 1/2 cups flour
1 teaspoon baking powder
1/2 teaspoon salt
2 Tablespoons unsweetened cocoa powder
1/2 cup unsalted butter (2 sticks), at room temperature
1 cup sugar
2 eggs, at room temperature
1 Tablespoon red food coloring( I use gel food coloring)
1 teaspoon vanilla extract
1 cup buttermilk, at room temperature
1 teaspoon white vinegar
1 teaspoon baking soda

Cream Cheese Frosting
Adapted from all recipes.

16 oz. cream cheese (2 packages), softened
1/2 cup unsalted butter (one stick), softened
1 teaspoon vanilla extract
4 cups powdered sugar, sifted

Note: This will make a large amount of frosting, enough to work with piping tips.If you prefer a thin layer of frosting, just divide the recipe by half, and you'll have enough for the 24 cupcakes.

Directions
1. Preheat oven to 350 F degrees. Line 2 cupcake pans with liners.

2. In a large bowl, sift together flour, baking powder, salt and cocoa. Set aside.

3. In the bowl of a stand mixer fitted with the paddle attachment, beat the butter and sugar at medium-high speed until fluffy, about 3-4 minutes. Lower speed to medium and add eggs one at a time, mixing well after each addition, scraping the bowl  twice or more. Add red food coloring and vanilla, mix until well combined.

4. Reduce mixer speed to low and add one third of the flour mixture to the butter mixture, alternating with the buttermilk, beat well, repeat with remaining flour and buttermilk,  you should end with the last third of the flour mixture, beat until well combined, making sure to scrape down the bowl with a spatula. Put your bowl near the cupcake pans.

5. In a small bowl, mix vinegar and baking soda, it will fizz right away. Add it to the cake batter, and stir with a spatula until well combined. Divide batter evenly between the cake pans, about 2/3 full. Bake for 15 minutes, or until a toothpick inserted into the center comes out clean. Let cupcakes cool in pan for 5 minutes, then transfer to a wire rack to cool completely. Allow cupcakes to cool completely before frosting, about an hour.

For the cream cheese frosting:

1. In the bowl of a stand mixer fitted with the paddle attachment, cream butter and cream cheese on medium-high until light and fluffy, about 4-5 minutes (Do not rush this step).

2. Reduce mixer speed to low, divide confectioners sugar into two parts, add the first half,  and beat for 2-3 minutes, add the remaining sugar and vanilla, increase mixer speed to medium and beat frosting for 2-3 minutes more, until smooth and fluffy. Frost cupcakes as desired. Now eat them all!!! ;)

Red Velvet Cupcakes
Adaptado de Pinch my salt. Hace 24 cupcakes.

Ingredientes
2 1/2 tazas de harina
1 cucharadita de polvo para hornear
1/2 cucharadita de sal
2 cucharadas de cocoa en polvo sin azúcar
1/2 taza de mantequilla sin sal (2 barras ), a temperatura ambiente
1 taza de azúcar
2 huevos, a temperatura ambiente
1 cucharada de colorante rojo (yo uso colorante en gel)
1 cucharadita de extracto de vainilla
1 taza de buttermilk, a temperatura ambiente (ó 1 tz de leche + 1 cucharada de jugo de limón sin semilla)
1 cucharadita de vinagre blanco
1 cucharadita de bicarbonato de sodio

Frosting de queso crema:
Adaptado de all recipes.

16 oz de queso crema ( 2 paquetes de 226 grms), suavizada
1/2 taza de mantequilla sin sal (una barra ), suavizada
1 cucharadita de extracto de vainilla 
4 tazas de azúcar en glas o impalpable, cernida

Nota: Esto hará una gran cantidad de frosting, lo suficiente para hacer decoraciones con duyas y darle altura. Si prefieren una capa delgada de frosting, por favor dividan la receta a la mitad y tendrán suficiente para los 24 cupcakes.

Instrucciones
1. Precaliente el horno a 180 grados C. Coloca capacillos a 2 moldes para cupcakes.

2. En un tazón grande, cierne la harina, el polvo para hornear, sal y cocoa. Pon a un lado.

3. En una batidora eléctrica con el aditamento de paleta, bate la mantequilla y el azúcar a velocidad media-alta hasta que quede esponjoso, alrededor de 3-4 minutos. Baja la velocidad a media y agregar los huevos uno a la vez, mezclando bien después de cada adición y raspando el tazón dos veces o más. Añade el colorante rojo y el extracto devainilla, mezxla hasta que este bien incorporado.

4. Reduce la velocidad de la batidora a baja y agrega una tercera parte de la mezcla de harina a la mezcla de mantequilla alternando con el buttermilk, batir bien , repita con la harina restante y el buttermilk, debes terminar con el último tercio de la mezcla de harina, batir hasta que este bien incorporado, asegurándose de raspar el tazón con una espátula. Toma tu tazón y colocalo cerca de los moldes de cupcakes.

5. En un tazón pequeño, mezcla el vinagre y el bicarbonato de sodio, hará efervescencia de inmediato. Añadir a la mezcla de pastel y revuelve bien para mezclar. Divide la mezcla en partes iguales entre los 24 moldes para pasteles, aproximadamente 2/ 3 de su capacidad. Hornea durante 15 minutos, o hasta que un palillo insertado en el centro salga limpio. Deja enfriar los cupcakes en el molde durante 5 minutos, luego transfierelos a una rejilla para enfriar completamente. Permitie que las cupcakes se enfríen completamente antes de poner el frosting, alrededor de una hora .

Para el glaseado de queso crema:

1. En una batidora eléctrica con el aditamento de paleta, bate la mantequilla y el queso crema en velocidad media hasta que esté suave y esponjoso, unos 4-5 minutos (no apresures este paso).


2. Reducir la velocidad de la batidora a baja, dividir el azúcar glas en 2 partes, agregar la primera mitad y batir por 2-3 minutos, agrega el azúcar restante y la vainilla, aumenta la velocidad de la batidora a media y batir durante 2-3 minutos más, hasta que esté suave y esponjosa. Decora los cupcakes a tu gusto. Ahora comelos todos! ! ! ;)


Love,
Di


Thursday, February 6, 2014

Flan Napolitano

Raspberry Bloom: Flan Napolitano

The weather in Puebla has been more than perfect, the days have been sunny and warm, and that's why last weekend I decided to make flan napolitano. I hadn't make it in a long time, and I almost forgot how good it is, OMG!! I loved it, definitely something that had to be shared.

This flan is a delicate dessert that melts in your mouth. It has a very smooth consistency with a subtle cream cheese flavor, that matches perfectly with the slightly burnt caramel syrup. You can enjoy it alone or add some fresh berries of your choice. I think it's perfect for small meetings, for a coffee date, or as a light dessert for a meal. I'm sure you will love it, just be careful because you might want to devour everything in one sitting.

I´d like to try new flavors of flan, so if you have any recipe, please share it in the comments below. I´ll be more than thankful! :) 

El clima en Puebla ha sido más que perfecto, los días han estado soleados y calurosos, así que el fin de semana pasado me di el lujo de hacer flan napolitano. Ya tenia un rato que no lo comía y oh-oh-oh, fue una verdadera delicia, algo que tenía que ser compartido.

Es un postre delicado que se deshace en tu boca, tiene una consistencia muy suave con un sutil sabor a queso crema, que queda más que perfecto con el jarabe de caramelo ligeramente quemado. Puedes disfrutarlo sólo o con bayas de tu elección.  Yo creo que es perfecto para reuniones pequeñas, la hora del café o como postre ligero para una comida. Estoy segura que les va a encantar, sólo tengan cuidado porque puede que lo quieran devorar todo en una sentada.

Me gustaría probar con nuevos sabores de flan, así que si tienen alguna receta rica, por favor compartanla en los comentarios. Estaré más que agradecida!! :)

Raspberry Bloom: Flan Napolitano

Raspberry Bloom: Flan Napolitano

Raspberry Bloom: Flan Napolitano


Flan Napolitano
Source: My mommy. Serves 8.

Ingredients
1 can condensed milk
1 can evaporated milk
1 8 oz. package cream cheese
4 eggs

For the syrup
2/3 cup sugar

Directions
Preheat oven to 350 degrees F.

To make the syrup:

In a medium saucepan over medium-low heat, melt sugar until liquefied and golden in color. Carefully pour hot syrup into a 9-inch cake pan, turning the cake pan to evenly coat the bottom and sides. Set aside.

To make the Flan:

1. It's the easiest thing in the world, put all the ingredients into a blender, and blend until smooth. Then put the flan mixture into the cake pan over the syrup. Cover with aluminium foil.

2. Place the cake pan in a larger roasting pan and add hot water to come halfway up the sides of the baking dish. Bake for 60 min, or until center is just set, but still jiggles slightly, mine took 1 hour and 20 minutes.  Remove dish from the larger pan to a wire rack; cool for 1 hour. Refrigerate overnight (preferably).

3. Once completely cool, run a small sharp knife around flan to loosen. Turn over onto a plate, shaking gently to release flan. Now hold yourself and try not to eat it all at once!! :)

Flan Napolitano
Fuente: Mi mami. Rinde 8 porciones.

Ingredientes
1 lata de leche condensada
1 lata de leche evaporada
1 paquete de 226 grms. de queso crema
4 huevos

Para el jarabe
2/3 de taza de azúcar

Instrucciones
Precalienta el horno a 180 grados C.

Para hacer el jarabe:

En una cacerola mediana a fuego medio-bajo, derrite el azúcar hasta que se haga líquida, debe verse como miel y de color dorado claro. Con cuidado, vierta el jarabe caliente en un molde para pastel de 9 pulgadas , dando vuelta al molde en círculos para cubrir el fondo y los lados. Pon a un lado.

Para hacer el Flan:

1. Es la cosa más fácil del mundo, poner todos los ingredientes en una licuadora y mezcle hasta que esté bien incorporado. A continuación, poner la mezcla de flan en el molde sobre el jarabe. Cubre el molde con papel  aluminio.

2. Coloca el molde en una charola grande, agrega agua caliente hasta cubrir a la mitad del molde, se cocinará a baño maría. Hornea durante 60 minutos o hasta que el centro esté cuajado, pero aún se mueva ligeramente, el mía tomó 1 hora y 20 minutos. Retirar el recipiente de la charola más grande hacia una rejilla para enfriar; enfria durante 1 hora. Despúes, refrigeralo durante la noche (de preferencia).

3. Una vez que se enfríe por completo, pasa un cuchillo pequeño y afilado alrededor del flan para aflojar. Da la vuelta sobre un plato, agitando suavemente para liberar el flan. Ahora trata de contenerte para no comerte todo el flan en un bocado! :)


Love,
Di

Friday, January 31, 2014

Soft Lemon Ricotta Cookies

Raspberry Bloom: Soft Lemon Ricotta Cookie

Citrus season is in full swing, and I must say I'm very happy about it, because I finally decided to buy a bag of Meyer lemons. I've been using them in salad dressing, strawberry lemonade ( I know it's winter, but here in Puebla there are days that don't feel like that at all), and a couple sweet yummy things, you know how I like them.

One of those sweet things were these delicious lemon-ricotta cookies, that have a cloud consistency and a delicious lemon flavor. Its texture is very soft almost like cake, they have a slight ricotta flavor, and the Meyer lemon certainly gives them a rich hint of  tartness. My two big advice would be, refrigerate the dough and use an ice cream scoop to make the balls, if you have one (obviously I don't have one), this is just to make more symmetrical and better looking cookies. Another thing I must say, is that due to these cookies are really moist the glaze tends to get like a syrup with each passing day, but don´t worry this doesn't affect the flavor at all, I just thought you should know it.

These cookies really made me think about springtime, in fact it seems that that's the only thing I can think about lately (besides Valentine's day), you know, fresh flowers, pastel shades, fresh food with light flavors. Anyway, I hope you enjoy these cookies as much as we did!

What about you,  Do you have any special spring craving, recipes, DIYs , or any fun activity??

_______________________________

La temporada de citricos esta en pleno apojeo y debo decir que estoy muy feliz por eso, ya que por fin me animé a comprar limones eureka. Los he estado usando en aderezo, limonada de fresa (ya se que es invierno, pero en Pueblita hay dias en los que no parece) y en cositas dulces, ya saben como me gustan. Una de ellas fueron estas deliciosas galletitas con consistencia de nube y delicioso sabor a limón, su textura es muy suave casi como pastel, tienen un ligero sabor a ricotta que se percibe en pequeños trocitos y el limón eureka les da un toque acidito, pero rico. Mis dos consejos serían refrigerar la masa y usar una cuchara para helado para hacer las bolitas, si tienen (obviamente yo no tengo uno), esto sólo para darles mejor formita. De igual forma debo decirles que debido a su consistencia húmeda el glaze tiende a hacerce jarabito con el paso de los días, pero en realidad esto no afecta para nada el sabor.

Hacer estas galletas me hizo querer que ya llegué la primavera, en realidad creo que es casi en lo único que puedo pensar ultimamente, además de San Valentín, ya saben, flores, colores pastel, comida con sabores más frescos y ligeros. En fin, espero las disfruten mucho!! 

Que hay de ustedes, ya tienen cositas que les gustaría hacer para primavera, recetas, DIYs, o alguna actividad???


Raspberry Bloom: Soft Lemon Ricotta Cookies

Raspberry Bloom: Soft Lemon Ricotta Cookie

Raspberry Bloom: Soft Lemon Ricotta Cookie

Raspberry Bloom: Soft Lemon Ricotta Cookie 

Soft Lemon Ricotta Cookies
Adapted from foodnetwork, by Giada De Laurentiis. Makes 22 cookies.

Ingredients
1 1/4 cups all-purpose flour
1/2 teaspoon baking powder
1/4 teaspoon salt
1/2 stick unsalted butter (1/4 cup), softened
3/4 cups sugar
1 lemon, zested (4 oz. aprox.)
1 1/2 tablespoons Meyer lemon juice
1 eggs
7. 5 ounce whole milk ricotta cheese

Glaze:
3/4 cup powdered sugar
1 1/2 tablespoons Meyer lemon juice
1/2 lemon, zested

Directions
1. In a medium bowl combine dry ingredients, flour, baking powder, and salt, mix with a fork. Set aside.

2. Using an electric mixer beat the butter, sugar,  and lemon zest together, until light and fluffy, about 5 minutes. Add the egg, beating until incorporated. Add the ricotta cheese and lemon juice, beat to combine. Stir in the dry ingredients. Mix the dough until slightly moist and well incorporated.

3. Cover dough tightly with plastic wrap, and chill on the fridge for at least 2 hours.

4. Preheat the oven to 375 degrees F.

5. Line 2 baking sheets with parchment paper. Scoop the dough onto the baking sheets. Bake for 15 minutes, or until slightly golden at the edges. Remove from the oven and let the cookies rest on the baking sheet for about 15 minutes.

6. Meanwhile prepare your glaze: Combine the powdered sugar, lemon juice, and lemon zest in a small bowl and stir until smooth.

7. Once your cookies have cooled a bit, spoon about 1/2-teaspoon of the glaze onto each cookie and gently spread it. Let the glaze harden before serving, about 20 min. Store in an airtight container.Now, let's eat!!

Galletas Suaves de Limón y Ricotta 
Adaptado de foodnetwork, por Giada De Laurentiis. Rinde 22 galletas.

Ingredientes
1 1/4 tazas de harina
1/2 cucharadita de polvo para hornear
1/4 cucharadita de sal
1/2 barra de mantequilla sin sal (1/4 de taza), ablandada
3/4 tazas de azúcar
1 huevo
1 limón eureka, ralladura ( 4 oz aprox.)
1 1/2 cucharadas de jugo de limón eureka
210 grms de queso ricotta de leche entera

Glaseado:
3/4 taza de azúcar glass
1 1/2 cucharadas de jugo de limón eureka
1/2 limón eureka, ralladura

Instrucciones
1. En un tazón mediano combina los ingredientes secos, harina, polvo para hornear y sal, mezcla con un tenedor. Pon a un lado.

2. Con una batidora eléctrica batir la mantequilla, el azúcar y la ralladura de limón juntos, hasta ligero y esponjada, aproximadamente 5 minutos. Añadir el huevo , batiendo hasta que se incorpore. Añade el queso ricotta y el jugo de limón, bate para combinar. Agregua los ingredientes secos. Mezcla hasta que la masa esté ligeramente húmeda y bien incorporada.

3. Cubre la masa con papel plástico y refrigerala durante al menos 2 horas.

4. Precaliente el horno a 375 grados F.

5. Forra 2 bandejas para hornear con papel pergamino/encerado o aluminio. Saca la masa del refrigerador y coloca la masa a cucharadas sobre la bandeja del horno. Hornear durante 15 minutos o hasta que esten ligeramente doradas en los bordes. Retira del horno y deja que las galletas reposen en la bandeja durante unos 15 minutos.

6. Mientras tanto preparar el glaseado: Combina el azúcar glass, jugo de limón y la ralladura de limón en un tazón pequeño y revuelve hasta que esté suave .

7. Una vez que tus galletas se han enfriado un poco, vierte aproximadamente 1/2 cucharadita de glaseado sobre cada galleta y untalo suavemente. Deja que el glaeado seque antes de servir, unos 20 min . Almacene en un recipiente hermético. Ahora,  a comer!


Love,
Di


Thursday, January 30, 2014

DIY Heart Pillow

Raspberry Bloom: DIY Heart Pillow

Some years ago I took a short course on how to make "stuffed animals", I learned to do many many things there, including this cute pillow, my pillow back then wasn't that pretty, and I may or may not  had to get rid of it, the thing is that since then I've always wanted to make a better version of it. After a long time and since Valentine's day is just around the corner, I finally decided to stop being lazy and make my pillow. It's a really easy DIY, you just have to cut, sew and stuff,  the best part is you can choose any fabric you like and make it the size you want.  I made mine with a red velvet fabric, it measures abut 16 -inch, and I used a simple straight stitch. I think this is a nice way to add some coziness to your space, and could also be a great Valentine's Day gift.

I'm very excited to share my first DIY with you, the truth is I really enjoy doing this kind of tiny projects, I love to customize, and make my own version of some things to make my surroundings happier and prettier. I Hope you like it, and definitely there will be more of this type of post in the future......

Hace algunos años tomé un cursito de como hacer peluches y ahi aprendi a hacer muchas muchas cosas, entre ellas este cojín, esa vez no me quedo tan lindo, pero me quede con muchas ganas de hacer uno en algún otro momento. Después de mucho tiempo y con motivo de San Valentín, decidí dejar de ser flojilla y hacer mi cojín. Es bastante sencillo, sólo es cortar, coser y rellenar, lo mejor de esto es que puedes elegir cualquier tela de tu agrado y hacerlo del tamaño que quieras.  Yo hice el mío de terciopelo rojo, mide aproximadamente 40 cm y usé máquina de coser con puntada sencilla. Yo creo que es una linda forma de hacer tu espacio más acogedor y además creo que también podría ser un muy buen regalo de San Valentín.

Estoy muy emocionada por compartir mi primer DIY con ustedes, la verdad es que disfruto mucho hacer este tipo de proyectos pequeñitos, me encanta costumizar y hacer mi propia versión de algunas cosas para hacer mi estorno más feliz y bonito. Espero que les guste y definitivamente habrá más de este tipo de post en el futuro......

Raspberry Bloom: DIY Heart Pillow

Supplies
Fabric, depending on the size of your heart/ Tela, dependiendo del tamaño de tu corazón
Pillow stuffing/ Relleno para almohada
Paper heart template, you can trace it by hand or print it/ Molde de corazón de papel, pudes trazarlo a mano o imprimirlo
Marker/ Marcador
Scissors/ Tijeras
Pins/ Alfileres 
Needle and thread to match your fabric/ Aguja e hilo que combine con tu tela
Sewing machine (or fabric glue)/ Maquina de coser (o pegamento para tela)

Raspberry Bloom: DIY Heart Pillow
1. Fold the fabric in half, and pin your heart template onto your fabric. Cut your heart, leaving a 1/2 inch seam allowance./ Dobla la tela por la mitad, y asegura con alfileres la plantilla de corazón en la tela. Corta el corazón, dejando un margen de 1 cm de costura.

Raspberry Bloom: DIY Heart Pillow
2. I like to baste things before sew, so I can have like a guide, but you can totally skip this step if you want. Now, sew with the sewing machine along the shape, leaving an opening in one side of the heart so you can easily stuff  the filling inside./ A mi me gustar hilvanar las cosas antes de coser, para que pueda tener como una guía, pero puedes omitir este paso si lo deseas. Ahora, cose con máquina a lo largo de la forma, dejando una abertura en un lado del corazón para que puedas rellenar fácilmente.

Raspberry Bloom: DIY Heart Pillow
3.Turn the fabric right side out and stuff./ Voltea la tela al derecho y rellena.

Raspberry Bloom: DIY Heart Pillow
4. Once is all filled and spongy, hand sew the side opening, closed with a needle and thread./ Una vez que está todo lleno y esponjoso, cose a mano la abertura lateral, cerrado con aguja e hilo.

Raspberry Bloom: DIY Heart Pillow

And that's it, now you have a pretty heart pillow to decorate your bed, couch, or chair, for Valentine's day or all year round. Just spread the love!!

Y eso es todo, ahora tienes una linda almohada de corazón para decorar tu cama, sofá, o  silla, para el día de San Valentín o durante todo el año.


Love,
Di

Wednesday, January 22, 2014

Instagram Diaries

Raspberry Bloom: Instagram Diaries
{Puerto Escondido stole my heart./ Puerto Escondido robó mi corazón}

The first instagram diaries of the year, I'm really excited to document what 2014 has prepared for us!! :)

El primer "instagram diaries" del año, estoy muy emocionada de documentar lo que el 2014 tiene preparado para nosotros! :)

Raspberry Bloom: Instagram Diaries
{I'm already getting ready for spring, this is the first time I use Meyer lemons and ricotta cheese./Ya me estoy preparando para la primavera, esta es la primera vez que uso limón eureka (los encontré en Costco) y queso ricotta}

Raspberry Bloom: Instagram Diaries
{The cutest donut ever./ La dona más bonita del mundo}

Raspberry Bloom: Instagram Diaries
{Thinking of Valentine's day, and summer, recipe here./ Pensando en el día de San Valentín y el verano, receta aquí.

Raspberry Bloom: Instagram Diaries
{Outfit for Enrique's birthday, I can wear a peplum top anytime of the year. /Outfit para el cumpleaños de Enrique, puedo llevar un top peplum en cualquier momento del año.

Raspberry Bloom: Instagram Diaries
{Berries + yogurt + maple syrup the best way to start my day./ Bayas + yogur + maple syrup la mejor manera de empezar mi día}


Instagram: @dianaabaroa 

Love,
Di

Tuesday, January 21, 2014

Strawberry Tart

Raspberry Bloom: Strawberry Tart

This is the first tart/pie of many more that you'll see throughout the year, and is also the first of three recipe I plan to share for Valentine's Day. I chose this tart because it's very easy to make, and it has a subtle romantic vibe, which in my opinion make it perfect for the occasion. I made this tart having V-day in mind, but I also think it's a warmer weather staple dish.

This tart has a delicious buttery crust, it´s filled with slightly sweetened pastry cream,  and topped with juicy fresh strawberries, in my humble opinion just the best thing ever. Besides, it has accessible ingredients, and you can make ahead most of it. This tart is perfect for a small celebration, a brunch, as dessert for a BBQ party, or just as a weekend treat, especially for the summertime. I hope you enjoy it, and if you have any favorite fruit tart/pie recipe please share!!

Have a great week!!

Esta es la primer tarta/pie de muchas más que veran a lo largo del año, también es la primera de tres receta que planeo compartir con motivo de San Valentín. Elegí esta tarta porque es muy sencilla y tiene ese toque medio romántico, simplemente me parece que es perfecta para la ocasión. Y no sólo  la hice pensando en el día de los enamorados, sino en los mesesitos más calurosos que cada día se acercan más.

Esta tarta esta compuesta por una deliciosa costra de mantequilla, rellena con crema pastelera de vainilla ligeramente endulzada y cubierta por jugosas fresas frescas, en mi humilde opinión una verdadera delicia. Es una receta práctica, porque lleva ingredientes accesibles y puedes adelantar la elaboración de algunos componentes, tal vez la crema pastelera es lo que más trabajo necesita, pero yo diria que es la clave para resaltar el color y sabor de las fresas. Esta tarta es perfecta para una pequeña celebración, un brunch, como postre en una parrillada, o sólo como un gusto de fin de semana para las próximas temporadas, especialmente para el verano. Espero que la disfruten mucho, y si tienen alguna tarta/pie de frutas favorito, por favor compartanla!!

Les deseo una semana feliz!!

Raspberry Bloom: Strawberry Tart

Raspberry Bloom: Strawberry Tart

Raspberry Bloom: Strawberry Tart

Raspberry Bloom: Strawberry Tart

Raspberry Bloom: Strawberry Tart

Raspberry Bloom: Strawberry Tart

Raspberry Bloom: Strawberry Tart

Strawberry Tart
(Adapted from Smitten Kitchen)

1 fully baked 9-inch tart shell, I used my pie crust recipe
Pastry cream (recipe below)
1 lb fresh strawberries, hulled

Directions
Spread the pastry cream in the bottom of the baked tart shell, and arrange the strawberries over the top to your liking. You can serve it immediately, or you can refrigerate it, and just take it out 10 minutes before serving. Enjoy!!

Pastry Cream

1 1/4 cups whole milk
1/2  vanilla bean, split and scraped (or 1 teaspoon vanilla extract)
3 large egg yolks
1/2 cup sugar
3 Tbs cornstarch
3 Tbs unsalted butter, at room temperature, cut into small pieces

Directions
1. In a small saucepan bring 1 cup milk and the vanilla bean (pulp and pod) to a boil, over medium heat. Cover the pan, and set aside.

2. Working in a heavy-bottomed medium saucepan, whisk the yolks, sugar, 1/4 cup milk, and cornstarch together until thick and pale, about 5 min. Whisking all the while, very slowly drizzle a quarter of the hot milk onto the yolks. Then, still whisking, pour the rest of the liquid in a steady stream over the tempered yolks. Discard the vanilla pod.

3. Put the pan over medium heat, and whisking vigorously and without stop, bring the milk-yolks mixture to the boil. Keep the mixture at the boil, whisking energetically, for 2 to 3 minutes, it will get thicker, then remove the pan from the heat and scrape the pastry cream into a clean bowl.

4. Cut the butter into chunks and stir the chunks into the hot pastry cream, continuing to stir until the butter is melted and incorporated. Now, press a piece of plastic wrap against the surface to prevent a skin from forming. At this point, the cream needs to be thoroughly chilled. You can either set the bowl into a larger bowl filled with ice cubes and cold water for about 20 min, or let it cool at room temperature, and then refrigerate it until ready to be used.

NOTES:
-If you are using vanilla extract, just bring the milk to a boil and proceed with the recipe, adding the extract before you add the butter to the hot pastry cream.
-The cream can be kept tightly covered in the refrigerator for up to 3 days.

Tarta de Fresa
(Adaptado de Smitten Kitchen)

1 base de tarta de 9 pulgadas, yo usé mi costra para pie
Crema pastelera (receta abajo )
450 grms de fresas frescas, cortadas

Instrucciones
Extender la crema pastelera en la base de tarta horneada y arreglar las fresas en la parte superior a tu gusto. Se puede servir de inmediato, o puedes refrigerarla, y sólo sacarla 10 minutos antes de servir. Disfrutala!

Crema Pastelera
1 1/4 tazas de leche entera
1/2 vaina de vainilla, dividida a la mitad y raspado el interior (o 1 cucharadita de extracto de vainilla )
3 yemas de huevo grandes
1/2 taza de azúcar
3 cucharadas de maicena
3 cucharadas Mantequilla sin sal , a temperatura ambiente , cortada en trozos pequeños

Instrucciones
1. En una olla pequeña poner a fuego medio 1 taza de leche y la vaina de vainilla ( pulpa y vaina), y dejar que de un hervor. Tapa la olla y deja a un lado.

2. En una cacerola mediana de fondo grueso, bate las yemas, el azúcar, 1/ 4 taza de leche y la maicena hasta que esté espesa y pálida, unos 5 minutos. Sin dejar de batir, vierte muy lentamente una cuarta parte de la leche caliente a las yemas. De igual forma, sin dejar de batir, vierte el resto de la leche en un flujo constante sobre las yemas temperadas. Desecha la vaina de vainilla .

3. Pon la cacerola a fuego medio, y batiendo vigorosamente y sin parar, llevar la mezcla de leche-yemas a ebullición. Mantener la mezcla en ebullición, batiendo enérgicamente de 2 a 3 minutos, se pondrá espesa. Retira la sartén del fuego y raspar la crema pastelera en un recipiente limpio.

4 . Corta la mantequilla en trozos y mezcla los trozos en la crema pastelera caliente, sin dejar de mover hasta que la mantequilla se derrita y se incorporé. Ahora, presiona un pedazo de plástico contra la superficie para evitar que la formación de nata. En este punto, la crema debe ser enfriada. Puedes colocar el recipiente dentro de otro recipiente de mayor tamaño que este lleno de cubitos de hielo y agua fría durante unos 20 minutos, o deje que se enfríe a temperatura ambiente, y luego refrigera hasta que esté listo para ser utilizado.

NOTAS:
- Si estas utilizando extracto de vainilla, hierve la leche y continua con la receta, añadiendo el extracto antes de añadir la mantequilla a la crema pastelera caliente.
- La crema se puede mantener bien tapada en el refrigerador hasta por 3 días.

Love,
Di

Tuesday, January 14, 2014

Perfect Pie Crust {Handmade}

Raspberry Bloom: Perfect Pie Crust {handmade}

This year I'm planning to make many many pies, and I thought it would be a great idea to share the recipe I always use to make my pie crust. It's a very simple recipe with step by step instructions, the procedure I'm sharing is all by hand, but you can also use a food processor to make the mixing part. In fact, I recently got a food processor and I can't wait to use it for this pie crust, I think it'll save me some time, and it'll be easier to make a batch at any time.

I could say that this recipe is the result of some adjustments I've made to the first recipe I used to make pie crust( some time ago ), just simple variations to the ingredients and procedure, and I'm very pleased with the result, I can certainly say that I've reached my ideal version. This dough so easy to make, smells amazing, it literally  tastes like slightly sweetened butter, and its texture is like a soft cookie that melts in your mouth,
besides I love the fact that it can be refrigerated or frozen, and it'll be as tasty as freshly made, is just perfect. I hope you can try it, and enjoy it as much as we do. If you have any questions or comments I am here to listen (read)!

Este año tengo planeado hacer muchos muchos pies y creí que sería una muy buena idea compartir la receta que siempre uso para mi costra de pie. Es una receta muy simple con instrucciones paso a paso, el procedimiento que estoy compartiendo es todo a mano, pero también se puede utilizar un procesador de alimentos para hacer la parte de la mezcla. De hecho, hace poco Enrique me trajo un procesador de alimentos y no puedo esperar para utilizarlo para hacer esta costra para pie, creo que me va a ahorrar un poco de tiempo y será más fácil hacerla en cualquier momento.

Se podría decir que esta receta es el resultado de algunas adaptaciones en ingredientes y procedimiento que le he hecho a la primera receta con la que hice costra para pie(hace ya algún tiempo), y estoy muy complacida con el resultado, ciertamente puedo decir que he llegado a mí versión ideal. Esta masa es súper sencilla, huele increíble, sabe a deliciosa mantequillita ligeramente endulzada y tiene una textura como de galletita suave que se derrite en tu boca, además me encanta el hecho de que puedes refrigerarla o congelarla y conserva todo su esplendor, es simplemente perfecta. Espero que la prueben y que la disfruten tanto como nosotros. Si tienen alguna duda o comentario aquí estoy para escucharlo(leerlo)!!

Raspberry Bloom: Perfect Pie Crust {handmade}

Raspberry Bloom: Perfect Pie Crust {handmade}

Raspberry Bloom: Perfect Pie Crust {handmade}

Raspberry Bloom: Perfect Pie Crust {handmade}

Raspberry Bloom: Perfect Pie Crust {handmade}

Raspberry Bloom: Perfect Pie Crust {handmade}

Raspberry Bloom: Perfect Pie Crust {handmade}

Raspberry Bloom: Perfect Pie Crust {handmade}

Raspberry Bloom: Perfect Pie Crust {handmade}

Raspberry Bloom: Perfect Pie Crust {handmade}

Perfect Pie Crust {handmade}
makes two 9-inch rounds (Adapted from chez pim)

Ingredients
2 1/4 cup all-purpose flour, plus extra for rolling
2 sticks or 8 ounces unsalted butter, very-cold, cut into 1/2 inch cubes
1/2 tsp salt
1 tsp sugar
1/4 cup cold water

Directions
1. Pour the flour, salt and sugar onto your pastry board or clean countertop.

2. Lay all the butter pieces on top of your pile of flour, and flip each butter chunk to coat it all with flour. Press the butter into the flour with the heal of your hand, you'll have to scrape up some of the flour and butter and flip it over the pile ( if you don't have a scraper you can use a knife). Keep pressing and scraping until the butter becomes thin flakes pressed into the flour. You should end up with a combination of medium flakes and some crumbs. Pile the crumbs.

3. Make a well in the middle of the pile, pour 1/4 cup of iced water into it. Now, work very quickly, use your finger tips to gently blend and distribute the mixture evenly into the water, we're going to gently dump the flour on the sides to the center(where the water is), mix well, you'll have to incorporate  all the butter/flour flakes with the water until you get a somewhat cohesive and smooth dough, it should gather it into a ball. Wrap tightly with plastic and let rest in the fridge for about 45 minutes.

4. After 45 minutes, remove the dough from the fridge and unwrap it. Flour your surface a little, this will avoid stickiness, and place the dough on your work surface or countertop, flour the top of the dough, too. With a rolling pin, roll the dough out to an elongated rectangle, brush off the excess flour from the top of the dough. You will see that the dough will become smoother and more pliable.

Raspberry Bloom: Perfect Pie Crust {handmade}

5. Folding, pick up one end of the rectangle, and fold it 2/3 of the way in, pick up the other end and fold it over that section, do it again, you'll end up with a smaller rectangle, now cut in half. Roll each piece into a ball, and flatten into a disc.

At this point your dough is ready to be used, you can roll it right away into your desired shape, or you can wrap it again in plastic and store it in the fridge, for later use.

6. For rolling into desired shape, sprinkle more flour if needed, just enough to avoid a sticky dough, and roll out to 1/4 inch thickness, and 2-3″ larger than your 9″ pie plate.

Important notes:
-If you feel your dough is a little to soft after divide it(after step #5), wrap your flatten dough discs in plastic and refrigerate at least 30 min before using them for baking.

-If the dough is in the fridge for more than 45 minutes it'll be a little firmer than necessary, so you'll have to let it warm up a bit before rolling.

-Tightly wrapped, the dough will keep in the fridge for a few days, and frozen for-practically-ever.

-To defrost your dough, put it in the fridge section the night before you plan to use it, and before rolling it into your desired shape let it warm at room temperature, this will take about 20 minutes, or until you feel it's okay to work with.

Costra para Pie Perfecta {hecha a mano}
Hace dos circulos de 9 pulgadas ( Adaptado de chez pim)

Ingredientes
2 1/4 taza de harina, y un poco más para espolvorear
2 barras o 226 grms de mantequilla sin sal, muy fría y cortada en cubos de una pulgada aprox.
1/2 cucharadita de sal
1 cucharadita de azúcar
1/4 taza de agua bien fría

Instrucciones
1. Vierta la harina, sal y azúcar en su tabla de amasar o superficie limpia.

2. Coloca todas las piezas de mantequilla en la parte superior de la pila de harina, y volteaa cada trozos de mantequilla de forma que lo cubras todo con harina. Comienza a aplastar la mantequilla sobre la harina con la palma de tu mano, tendrás que raspar un poco la harina y la mantequilla y darle la vuelta a la pila (si usted no tiene un raspador se puede utilizar un cuchillo). Segue aplastando y raspando hasta que la mantequilla se convierta en escamas finas prensadas en la harina. Debes terminar con una combinación de escamas medianas y algunas migajas. Apila todo.

3. Haz un hueco en el centro de la pila, vierte 1/4 taza de agua helada en el hueco. Ahora, se debe trabajar muy rápidamente, usa tus dedos para mezclar suavemente y distribuir la mezcla uniformemente en el agua, vamos a volcar con cuidado la harina de los lados hacia el centro de la pila (donde esta el agua), y mezcla bien, debes incorporar todos los copos de mantequilla-harina con el agua hasta obtener una masa cohesiva de apariencia suave, debe formar una bola y envolverla herméticamente con plástico, para poder dejarla reposar en el refrigerador durante unos 45 minutos.

4. Después de 45 minutos, retira la masa del refrigerador y desenvuelva. Enharina un poco la superficie, esto evitara que se pegue, y coloca la masa en la tabla de amasar o superficie, también espolvorea un poco de harina en la parte superior. Con un rodillo extiende la masa en un rectángulo alargado, y sacude el exceso de harina de la parte superior de la masa. Verás que la pasta se verá muy suave y se sentirá más flexible.

5. Para doblarla, levanta un extremo del rectángulo y doblalo 2/3 hacía adentro, toma el otro extremo y doblalo sobre esa sección, hazlo una vez más, corta el rectángulo resultante a la mitad. Ahora dale forma circular a cada pieza y aplanala en un disco.

En este punto su masa está lista para ser utilizada, se puede dar la forma deseada de inmediato, o se puede envolver nuevamente en plástico y guardarla en el refrigerador, para usar después.

6. para darle la forma deseada, espolvoree más harina, lo suficiente para evitar una masa pegajosa (si es necesario), y dale forma con el rodillo, más o menos de un espesor de 1/4 pulgada y 2-3 pulgadas más grande que un molde para pie de 9 ".

Notas importantes:
- Si crees que tu masa esta un poco suave después de dividirla(paso #5), envuelve los discos de masa aplanada en plástico y refrigera por lo menos 30 minutos antes de usarlos para hornear.

- Si tu masa ha estado en el refrigerador por más de 45 min. se pondrá un poco más firme de lo necesario, así que deja que se "caliente" un poco antes de usar.

- Bien envuelta, la masa se ​​mantendrá en el refrigerador durante un par de días, y se congelada casi por siempre.

- Para descongelar la masa, colocala en la sección del refrigerador una noche antes de que planees usarla, y antes de darle forma dejala a temperatura ambiente por unos 20 minutos, , o hasta que sientas que ya la puedes trabajar.

Love,
Di

Related Posts Plugin for WordPress, Blogger...